Feeling overwhelmed by the sheer breadth of modern tech? Many advanced fields, from Python development to Data Science, DevOps, and Cloud Engineering, share a common, powerful foundation: Linux. This introductory guide breaks down its importance, revealing its underlying structure and providing the practical commands to help you confidently take your first steps into mastering this crucial operating system.
Linux Overview
Linux is a powerful and popular open-source operating system that serves as the foundation for a vast array of computing devices, from smartphones to supercomputers. It’s known for its stability, security, and flexibility.
Why Use Linux?
There are numerous compelling reasons to choose Linux:
- Open Source and Free: Linux is free to use, distribute, and modify. This eliminates licensing costs and fosters a vibrant community of developers who contribute to its continuous improvement.
- Stability and Reliability: Linux systems are renowned for their uptime and stability. They are less prone to crashes and freezes compared to other operating systems, making them ideal for servers and critical applications.
- Security: Linux has a robust security model, making it less susceptible to viruses and malware. Its open-source nature allows for constant security audits by the community.
- Flexibility and Customization: Linux is highly customizable. Users can tailor almost every aspect of the operating system to their preferences, from the desktop environment to system utilities.
- Performance: Linux can run efficiently on a wide range of hardware, including older machines, making it a good choice for revitalizing older computers.
- Command-Line Interface (CLI): While graphical interfaces are available, Linux’s powerful command-line interface provides unparalleled control and automation capabilities for experienced users.
- Software Availability: A vast ecosystem of free and open-source software is available for Linux, covering almost every conceivable need, from office suites to development tools.
- Developer Friendly: Linux is a favorite among developers due to its powerful tools, scripting capabilities, and compatibility with various programming languages.
Detailed Linux OS Architecture
The Linux operating system architecture is modular and layered, allowing for significant flexibility and power. It primarily consists of the following components:
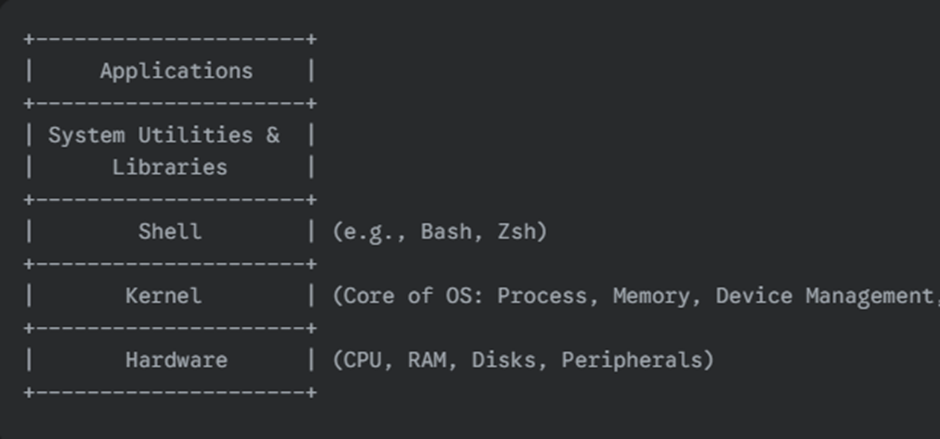
- Hardware: This is the physical layer of the system, including the CPU, RAM, hard disk, and other peripherals.
- Kernel: The kernel is the core of the Linux operating system. It acts as the bridge between the hardware and the applications. Its primary responsibilities include:
- Process Management: Scheduling and managing running programs (processes).
- Memory Management: Allocating and deallocating memory to processes.
- Device Management: Interacting with hardware devices through device drivers.
- System Calls: Providing an interface for applications to request services from the kernel.
- Shell: The shell is a command-line interpreter that provides an interface for users to interact with the kernel. It takes commands from the user and executes them, often by calling kernel functions. Examples include Bash, Zsh, and Ksh.
- System Utilities/Libraries: These are a set of programs and libraries that provide various functionalities to the operating system and applications. They include tools for file management, text processing, network configuration, and more. Examples: ls (list files), cp (copy files), grep (search text).
- Applications: These are the user-facing programs that run on top of the operating system, such as web browsers, office suites, media players, and development environments.
- Graphical User Interface (GUI) / Desktop Environment: While not strictly part of the kernel, the GUI provides a visual way for users to interact with the system. It typically includes a desktop, windows, icons, and menus. Popular desktop environments include GNOME, KDE Plasma, XFCE, and MATE.
What are Linux Distributions?
A Linux distribution (distro) is a complete operating system built on top of the Linux kernel, bundled with a set of system utilities, libraries, applications, and a desktop environment. Think of the Linux kernel as the engine, and a distribution as a complete car, ready to drive, with different models offering different features and aesthetics.
How they came into picture:
Initially, working with the raw Linux kernel was complex, requiring users to manually compile and configure various components. This was a significant barrier for widespread adoption. To make Linux more accessible and user-friendly, individuals and organizations started bundling the kernel with pre-configured software packages, graphical interfaces, and installation tools. These bundles evolved into what we now know as Linux distributions.
Each distribution often caters to specific user needs or philosophies. For example:
Red Hat Enterprise Linux (RHEL): A commercial distribution widely used in enterprise environments, offering extensive support.
Ubuntu: Popular for its user-friendliness and large community support, suitable for beginners.
Fedora: Known for adopting the latest open-source technologies, often used by developers.
Debian: A highly stable and robust distribution, serving as the base for many other distros (including Ubuntu).
Arch Linux: A minimalist and highly customizable distribution, favoured by experienced users who prefer to build their system from the ground up.
Linux Mint: Based on Ubuntu, designed for ease of use, especially for users migrating from Windows.
Commonly Used Linux Commands
1. File Management
- ls: List directory contents.
- ls: Lists files and directories in the current directory.
- ls -l: Provides a long listing format, showing permissions, owner, group, size, and modification date.
- ls -a: Displays all files, including hidden ones (those starting with a dot.).
- ls -lh: Long listing in a human-readable format (e.g., 4.0K instead of 4096 bytes).
- Example: ls -la /var/log (lists all files in /var/log with detailed information)
- cd: Change directory.
- cd /home/pramod: Navigates to the /home/pramod directory.
- cd ..: Moves up one directory level.
- cd ~: Returns to the user’s home directory.
- cd -: Goes back to the previous directory.
- pwd: Print working directory.
- pwd: Displays the full path of your current location in the file system.
- cp: Copy files or directories.
- cp file1.txt /tmp: Copies file1.txt to the /tmp directory.
- cp -r directory1 directory2: Recursively copies directory1 and its contents to directory2. Use -r (or -R) for directories.
- cp file1.txt file_backup.txt: Creates a copy of file1.txt named file_backup.txt in the same directory.
- mv: Move or rename files or directories.
- mv oldname.txt newname.txt: Renames oldname.txt to newname.txt in the current directory.
- mv file1.txt /tmp/new_location/: Moves file1.txt into the /tmp/new_location/ directory.
- rm: Remove files or directories.
- rm file1.txt: Deletes file1.txt. Be careful, rm does not move files to a recycle bin!
- rm -r directory_to_remove: Recursively removes directory_to_remove and its contents.
- rm -f file_to_force_remove: Forces the removal of file_to_force_remove without prompting for confirmation.
- rm -rf /tmp/old_directory: Forcefully and recursively removes /tmp/old_directory and all its contents. Use with extreme caution!
- touch: Create a new empty file or update timestamps.
- touch new_empty_file.txt: Creates an empty file named new_empty_file.txt. If the file exists, it updates its modification timestamp.
- mkdir: Create a new directory.
- mkdir new_folder: Creates a directory named new_folder.
- mkdir -p /path/to/nonexistent/sub_folder: Creates all necessary parent directories if they don’t exist.
- rmdir: Remove an empty directory.
- rmdir empty_directory: Deletes empty_directory, but only if it’s completely empty. For non-empty directories, use rm -r.
- cat: Concatenate and display file contents.
- cat file.txt: Displays the entire content of file.txt to the standard output.
- cat file1.txt file2.txt > combined.txt: Concatenates file1.txt and file2.txt and redirects the output to combined.txt.
- head: Display the first few lines of a file.
- head file.txt: Shows the first 10 lines of file.txt.
- head -n 5 file.txt: Displays the first 5 lines of file.txt.
- tail: Display the last few lines of a file.
- tail file.txt: Shows the last 10 lines of file.txt.
- tail -n 20 file.txt: Displays the last 20 lines of file.txt.
- tail -f /var/log/nginx/access.log: Follows (monitors in real-time) new lines added to the nginx access log. Useful for live debugging.
- chmod: Change file permissions.
- chmod 755 script.sh: Sets permissions for script.sh to read, write, and execute for the owner (7), and read and execute for the group (5) and others (5). Often used for making scripts executable.
- chmod +x script.sh: Adds execute permission for the owner.
- Permissions in brief: Numeric values (e.g., 755) represent read (4), write (2), and execute (1). The three digits correspond to owner, group, and others, respectively.
- chown: Change file ownership.
- sudo chown newuser file.txt: Changes the owner of file.txt to newuser.
- sudo chown newuser:newgroup directory/: Changes both the owner and the group of directory/ to newuser and newgroup respectively.
- find: Search for files in a directory hierarchy.
- find /var -name “*.log”: Searches for all files ending with .log within the /var directory and its subdirectories.
- find /home -type d -name “test”: Finds directories named test under the /home directory.
- find . -size +1G: Finds files larger than 1GB in the current directory and its subdirectories.
- locate: Find files by name using a pre-built database.
- locate apache2.conf: Quickly finds the path to apache2.conf. Note: locate uses a database that is updated periodically (often daily). If a file was just created, it might not be in the database yet. Use sudo updatedb to update the database manually.
- grep: Search text using patterns.
- grep “error” /var/log/syslog: Searches for the string “error” within the /var/log/syslog file.
- grep -i “warning” /var/log/messages: Searches for “warning” case-insensitively.
- ls -l | grep “.txt”: Pipes the output of ls -l to grep to show only lines containing .txt.
- diff: Compare two files line by line.
- diff file1.txt file2.txt: Shows the differences between file1.txt and file2.txt.
- tar: Archive files.
- tar -cvf archive.tar /path/to/files: Creates a new tar file named archive.tar containing files in verbose mode.
- tar -xvf archive.tar: Extracts the contents of archive.tar in verbose mode.
- tar -czvf archive.tar.gz /path/to/files: Creates a gzipped tar archive (compression is indicated by z).
- tar -xjvf archive.tar.bz2: Extracts a bzip2 compressed tar archive (compression is indicated by j).
- zip/unzip: Compress and extract files (specifically for .zip archives).
- zip -r myarchive.zip directory_to_zip: Compresses directory_to_zip recursively into myarchive.zip.
- unzip myarchive.zip: Extracts the contents of myarchive.zip.
- scp: Securely copy files over SSH.
- scp file.txt user@remote:/path/to/destination: Copies file.txt from the local machine to a remote host.
- scp user@remote:/path/to/remote_file.txt .: Copies remote_file.txt from a remote host to the current local directory.
2. Text Editors
Working with text files is a fundamental part of managing a Linux system, whether you’re editing configuration files, writing scripts, or simply taking notes. Linux offers a variety of text editors that run directly in the terminal, with nano and vi/vim being two of the most common and essential.
i)nano
nano is a simple and intuitive text editor, perfect for users just starting out with the command line. It’s user-friendly because it displays common commands (shortcuts) right at the bottom of the screen, making it easy to learn and remember.
nano myfile.txt:This command opensmyfile.txtfor editing. Ifmyfile.txtdoesn’t exist,nanowill create a new, empty file with that name.- Once in
nano, you can type normally. Use your arrow keys to move the cursor around the text. Ctrl + O: PressCtrl + O(the^symbol you see innanorefers to theCtrlkey).nanowill prompt you to confirm the filename at the bottom. PressEnterto save your changes to the file.Ctrl + X: PressCtrl + X. If you have unsaved changes,nanowill ask if you want to save them before quitting. PressYfor Yes,Nfor No, orCtrl + Cto cancel and stay in the editor.- Other Useful Shortcuts (displayed at the bottom):
Ctrl + K: Cut the current line.Ctrl + U: Paste the cut text.Ctrl + W: Search for specific text within the file.
ii)vi / vim (Powerful and Ubiquitous)
vi (and its improved version, vim – Vi IMproved) is an incredibly powerful text editor that you’ll find on virtually every Unix-like system. While it has a steeper learning curve than nano due to its “modal” operation, mastering vi/vim can significantly boost your efficiency, especially when working on remote servers where other editors might not be available.
The key concept in vi/vim is modes:
- Command Mode (or Normal Mode): This is the default mode when you open
vi. In this mode, you navigate the file, delete lines, copy text, and execute various commands (like saving or quitting). You cannot type directly into the file in this mode. - Insert Mode: In this mode, you can type and modify the actual text in the file. This is where you’ll do your writing.
Basic vi/vim Operations:
vi myconfig.conf:This command opensmyconfig.conf. You’ll start in Command Mode.- Entering Insert Mode: From Command Mode, press one of the following keys to start typing:
i: Insert text before the current cursor position.a: Append text after the current cursor position.o: Open a new line below the current line and enter Insert Mode.
- Exiting Insert Mode (Back to Command Mode):
- Press the
Esckey. This is crucial for running commands.
- Press the
- Saving and Quitting (from Command Mode):
:w+Enter: Save the file.:q+Enter: Quitvi(only works if no changes have been made or saved).:wq+Enter: Save and then quit. This is a very common way to exit.ZZ(Shift+Z twice): This is a shortcut for save and quit.:q!+Enter: Quit without saving (force quit). Use this when you want to discard all changes.
- Basic Navigation (in Command Mode):
- Arrow keys: You can use them to move around.
h, j, k, l: Traditionalvikeys for left, down, up, right.gg: Go to the beginning of the file.G: Go to the end of the file.
- Deleting Text (in Command Mode):
x: Delete the character under the cursor.dd: Delete the entire current line.dw: Delete the current word.
- Copying and Pasting (in Command Mode):
yy: Yank (copy) the entire current line.p: Paste the yanked text below the current line.
3. System Information and Monitoring
- top: Display running processes and system usage.
- top: Provides a dynamic real-time view of running processes, CPU usage, memory usage, etc. Press q to quit.
- htop: Interactive process viewer.
- htop: An enhanced, more user-friendly version of top with color-coded output and easy-to-use controls (often needs to be installed, e.g., sudo apt install htop).
- ps: Display current processes.
- ps aux: Shows all running processes from all users, including those not attached to a terminal. (A=all, U=user, X=daemon/no-control-tty).
- ps -ef: Another common option to list all processes with full format listing.
- ps aux | grep nginx: Filters the ps aux output to show only processes related to “nginx”.
- df: Show disk space usage.
- df -h: Displays disk space usage in a human-readable format (e.g., 10G instead of bytes).
- df -i: Shows inode usage (number of files and directories).
- du: Show directory space usage.
- du -sh /var/log: Summarizes the disk usage of the /var/log directory in a human-readable format.
- du -h –max-depth=1: Shows disk usage for subdirectories in the current location.
- free: Show memory usage.
- free -h: Displays memory usage (total, used, free, shared, buff/cache, available) in a human-readable format.
- free -m: Shows memory in megabytes (MB).
- uptime: Show system uptime.
- uptime: Displays how long the system has been running, number of logged-in users, and load averages.
- uname: Show system information.
- uname -a: Displays all system information (kernel name, hostname, kernel release, kernel version, machine hardware name, operating system).
- uname -r: Shows the kernel release.
- whoami: Display the current logged-in user.
- whoami: Simply outputs the effective username of the current user.
- lsof: List open files and associated processes.
- lsof -i :8080: Lists all processes that have port 8080 open (useful for finding out what’s listening on a specific port).
- lsof /var/log/syslog: Shows which processes are currently using syslog.
- vmstat: Report virtual memory statistics.
- vmstat 1 5: Displays virtual memory statistics (processes, memory, swap, I/O, system, CPU) every 1 second, 5 times.
- iostat: Report I/O statistics.
- iostat -d 2: Shows disk I/O statistics every 2 seconds. Useful for monitoring disk performance.
- netstat: Display network connections and routing tables.
- netstat -tuln: Shows active TCP and UDP connections, listening sockets, and displays numerical addresses and port numbers instead of resolving hostnames (-n).
- netstat -r: Displays the kernel IP routing table.
- ifconfig: Display or configure a network interface. (Being replaced by ip command in many modern distributions).
- ifconfig: Shows information about all active network interfaces (IP address, MAC address, etc.).
- ifconfig eth0 up: Brings the eth0 interface up.
- ip: Modern alternative to ifconfig.
- ip a: Displays information about all network interfaces (similar to ifconfig).
- ip route show: Shows the routing table (similar to netstat -r).
- ping: Check network connectivity.
- ping google.com: Sends ICMP echo requests to google.com to check reachability and measure round-trip time. Press Ctrl+C to stop.
- ping -c 5 google.com: Sends 5 packets to google.com and then stops.
- traceroute: Track the route packets take to a destination.
- traceroute google.com: Shows the sequence of routers (hops) that packets traverse to reach google.com. Useful for diagnosing network latency or connectivity issues.
4. Package Management (Ubuntu/Debian)
- sudo apt update: Update package lists.
- This command fetches the latest information about available packages from the repositories configured on your system. It does not install or upgrade any software.
- sudo apt upgrade: Upgrade all installed packages.
- After apt update, this command installs newer versions of all installed packages. It only upgrades existing packages and won’t install new ones that weren’t previously installed.
- sudo apt install <package_name>: Install packages.
- sudo apt install nginx: Installs the NGINX web server.
- sudo apt install <package1> <package2>: Installs multiple packages.
- sudo apt remove <package_name>: Remove packages.
- sudo apt remove nginx: Removes the nginx package, but may leave configuration files behind.
- sudo apt purge <package_name>: Remove packages and their configuration files.
- sudo apt purge nginx: Completely removes the nginx package along with its configuration files.
- sudo apt autoremove: Remove automatically installed packages that are no longer needed.
- Cleans up dependencies that were installed with other packages but are no longer required.
- dpkg: Install, remove, and manage individual Debian packages.
- sudo dpkg -i package.deb: Installs a .deb package file.
- dpkg -l | grep <package_name>: Lists installed packages and filters for a specific one.
5. User and Permission Management
- useradd: Add a new user.
- sudo useradd -m newuser: Creates a new user named newuser and creates a home directory for them (-m).
- sudo useradd -s /bin/bash -m newuser: Creates a user with a specific shell.
- userdel: Delete a user.
- sudo userdel newuser: Deletes the user newuser but leaves their home directory and mail spool.
- sudo userdel -r newuser: Recursively deletes the user and their home directory and mail spool.
- usermod: Modify a user.
- sudo usermod -aG sudo newuser: Adds newuser to the sudo group (allowing them to use sudo). The -aG ensures the user is added to the group, not just assigned to it as their primary group.
- sudo usermod -l new_username old_username: Renames a user.
- passwd: Change user password.
- passwd: Allows the current user to change their own password.
- sudo passwd username: Allows root to change another user’s password.
- groupadd: Create a new group.
- sudo groupadd newgroup: Creates a new group named newgroup.
- groupdel: Delete a group.
- sudo groupdel oldgroup: Deletes the group oldgroup.
- groups: Show groups of a user.
- groups: Shows the groups the current user belongs to.
- groups username: Shows the groups username belongs to.
- su: Switch user.
- su – username: Switches to username’s account and loads their environment.
- su -: Switches to the root user and loads the root environment.
- sudo: Execute a command as another user, usually root.
- sudo apt update: Executes apt update with root privileges. You will be prompted for your password (not root’s password).
- sudo -u otheruser command: Executes command as otheruser.
6. Networking
- curl: Transfer data from or to a server.
- curl https://example.com: Fetches the content of https://example.com and displays it to standard output.
- curl -O https://example.com/file.zip: Downloads file.zip from the URL and saves it with its original filename.
- curl -L http://example.com: Follows redirects.
- wget: Download files from the internet.
- wget https://example.com/image.jpg: Downloads image.jpg from the URL.
- wget -r -np https://example.com/docs/: Recursively downloads contents from the /docs/ directory, avoiding parent directories.
- ssh: Secure shell to a remote server.
- ssh user@remote_host: Connects to remote_host as user.
- ssh -p 2222 user@remote_host: Connects to remote_host on port 2222.
- telnet: Connect to a remote machine (often used for testing port connectivity).
- telnet example.com 80: Attempts to connect to example.com on port 80. If successful, it indicates the port is open and a service is listening.
- nslookup: Query DNS records. (Older, dig is preferred)
- nslookup google.com: Resolves the IP address for google.com.
- dig: DNS lookup utility (more powerful and flexible than nslookup).
- dig google.com: Performs a DNS query for google.com.
- dig +short google.com: Shows only the IP address.
- dig google.com MX: Queries for Mail Exchange (MX) records.
- iptables: Configure firewall rules.
- sudo iptables -L: Lists the current iptables rules.
- sudo iptables -A INPUT -p tcp –dport 80 -j ACCEPT: Adds a rule to accept incoming TCP traffic on port 80.
- firewalld: Firewall management (CentOS/RHEL, newer distributions).
- sudo firewall-cmd –list-all: Lists all firewall rules and settings for the default zone.
- sudo firewall-cmd –add-service=http –permanent: Adds HTTP service permanently. Then sudo firewall-cmd –reload.
- hostname: Show or set the system hostname.
- hostname: Displays the current hostname.
- sudo hostname new_hostname: Sets the system’s hostname (temporary, often requires editing /etc/hostname for permanent change).
7. Process Management
- kill: Send a signal to a process.
- kill <PID>: Sends the TERM (terminate) signal (signal 15) to the process with the specified Process ID (PID). This requests the process to shut down gracefully.
- kill -9 <PID>: Sends the KILL signal (signal 9) to the process. This forcefully terminates the process and cannot be ignored. Use only when kill <PID> doesn’t work.
- Example: kill 1234 (attempts to gracefully terminate process 1234)
- killall: Kill processes by name.
- killall nginx: Sends a TERM signal to all processes named nginx.
- killall -9 firefox: Forcefully kills all firefox processes.
- pkill: Kill processes by pattern matching.
- pkill nginx: Kills all processes whose names contain “nginx”.
- pkill -u username: Kills all processes owned by username.
- bg: Move a job to the background.
- ./script.sh &: Runs script.sh in the background (the & at the end).
- After typing Ctrl+Z to stop a foreground process, bg will resume it in the background.
- fg: Bring a job to the foreground.
- fg: Brings the most recently backgrounded job to the foreground.
- fg %1: Brings job number 1 to the foreground (use jobs to see job numbers).
- jobs: List background jobs.
- jobs: Displays a list of jobs running in the background in the current shell.
8. Disk Management
- fdisk: Partition a disk.
- sudo fdisk -l: Lists disk partitions. Use with extreme caution, as incorrect usage can lead to data loss. This command is typically used for partitioning new disks or re-partitioning existing ones.
- mkfs: Make a filesystem.
- sudo mkfs.ext4 /dev/sdb1: Creates an ext4 filesystem on the partition /dev/sdb1. This will erase all data on the partition.
- mount: Mount a filesystem.
- sudo mount /dev/sdb1 /mnt: Mounts the partition /dev/sdb1 to the /mnt mount point. Data on /dev/sdb1 will then be accessible under /mnt.
- sudo mount -a: Mounts all filesystems listed in /etc/fstab.
- umount: Unmount a filesystem.
- sudo umount /mnt: Unmounts the filesystem currently mounted at /mnt. Always unmount before physical removal of a device.
- lsblk: List block devices.
- lsblk: Lists all block devices (disks, partitions, and their relationships) in a tree-like format.
- lsblk -f: Shows filesystem types, UUIDs, and mount points.
- blkid: Print block device attributes.
- sudo blkid: Displays the UUID (Universally Unique Identifier) and filesystem type of block devices. Useful for configuring /etc/fstab.
9. Text Processing
- awk: Pattern scanning and processing language.
- awk ‘{print $1}’ file.txt: Prints the first column (field) of each line in file.txt. Fields are typically space-separated by default.
- awk -F’:’ ‘{print $1, $NF}’ /etc/passwd: Uses : as a field separator and prints the first and last fields of each line in /etc/passwd.
- sed: Stream editor for modifying text.
- sed ‘s/old/new/g’ file.txt: Replaces all occurrences (g for global) of “old” with “new” in file.txt and prints the result to standard output (does not modify the original file unless redirected).
- sed -i ‘s/old/new/g’ file.txt: Modifies file.txt in-place.
- sort: Sort lines of text files.
- sort file.txt: Sorts lines in file.txt alphabetically.
- sort -n numbers.txt: Sorts numbers.txt numerically.
- sort -r file.txt: Sorts in reverse order.
- uniq: Report or omit repeated lines. (Works best on sorted input)
- sort file.txt | uniq: Sorts file.txt and then removes duplicate lines.
- sort file.txt | uniq -c: Counts and displays the number of occurrences of each unique line.
- cut: Remove sections from each line of files.
- cut -d’,’ -f1,3 data.csv: Uses a comma as a delimiter (-d) and extracts the first and third fields (-f) from data.csv.
- wc: Word, line, character count.
- wc -l file.txt: Counts the number of lines in file.txt.
- wc -w file.txt: Counts the number of words in file.txt.
- wc -c file.txt: Counts the number of characters in file.txt.
- tr: Translate or delete characters.
- echo “hello WORLD” | tr ‘[:lower:]’ ‘[:upper:]’: Converts all lowercase characters to uppercase.
- cat file.txt | tr -d ‘ ‘: Deletes all spaces from file.txt.
- nl: Number lines of files.
- nl file.txt: Displays file.txt with line numbers.
10. Logging and Auditing
- dmesg: Print or control the kernel ring buffer.
- dmesg: Displays messages from the kernel buffer, including hardware recognition, device drivers, and system errors during boot-up.
- dmesg | grep “eth0”: Filters kernel messages related to the eth0 network interface.
- journalctl: Query the systemd journal.
- sudo journalctl -u nginx: Displays logs specifically for the nginx service.
- sudo journalctl -f: Follows (tails) the journal in real-time, similar to tail -f.
- sudo journalctl –since “2023-01-01 10:00:00” –until “2023-01-01 11:00:00”: Filters logs by time.
- logger: Add entries to the system log.
- logger “This is a custom message from my script.”: Adds a message to the system log (e.g., /var/log/syslog or journald).
- last: Show listing of last logged-in users.
- last: Displays a list of recently logged-in users, including login and logout times.
- history: Show command history.
- history: Displays a list of commands previously executed in the current shell session.
- !n: Executes the nth command from the history (e.g., !123).
- !string: Executes the most recent command starting with string.
11. Archiving and Backup
- tar: Archive files (as detailed in File Management).
- tar -cvf archive.tar /path/to/files: Creates an uncompressed archive.
- tar -xvf archive.tar: Extracts an uncompressed archive.
- tar -czvf archive.tar.gz /path/to/files: Creates a gzipped archive.
- tar -xzvf archive.tar.gz: Extracts a gzipped archive.
- tar -cjvf archive.tar.bz2 /path/to/files: Creates a bzip2 archive.
- tar -xjvf archive.tar.bz2: Extracts a bzip2 archive.
- rsync: Synchronize files and directories.
- rsync -avz /source /destination: Archive mode (preserves permissions, timestamps, etc.), verbose output, and z compression during transfer. Excellent for backups and synchronizing data between local and remote systems efficiently (only transfers changed parts).
- rsync -avz /local/dir user@remote:/remote/dir: Syncs a local directory to a remote server.
- rsync -avz user@remote:/remote/dir /local/dir: Syncs a remote directory to a local machine.
12. Shell Scripting
- echo: Display message or text.
- echo “Hello, DevOps!”: Prints “Hello, DevOps!” to the terminal.
- echo $PATH: Displays the value of the PATH environment variable.
- read: Read input from the user.
- read -p “Enter your name: ” name: Prompts the user to enter their name and stores it in the name variable.
- export: Set environment variables.
- export MY_VARIABLE=”some_value”: Sets an environment variable MY_VARIABLE. This variable will be available to child processes.
- export PATH=$PATH:/new/path: Appends /new/path to the existing PATH environment variable, making executables in that path directly runnable.
- alias: Create shortcuts for commands.
- alias ll=’ls -lh’: Creates an alias ll that executes ls -lh. This is temporary for the current session. To make it permanent, add it to your shell’s startup file (e.g., ~/.bashrc or ~/.zshrc).
- sh, bash, zsh: Execute shell scripts.
- ./script.sh: Executes script.sh if it has executed permissions and a shebang line (e.g., #!/bin/bash).
- bash script.sh: Explicitly executes script.sh using the bash interpreter.
13. System Configuration and Management
- crontab: Schedule periodic tasks.
- crontab -e: Opens the user’s crontab file for editing. This file defines scheduled jobs (cron jobs).
- Example entry: 0 2 * * * /path/to/backup.sh (Runs backup.sh at 2:00 AM every day).
- crontab -l: Lists the current user’s cron jobs.
- systemctl: Control the systemd system and service manager. (Modern Linux distributions use systemd).
- sudo systemctl start nginx: Starts the nginx service.
- sudo systemctl stop nginx: Stops the nginx service.
- sudo systemctl restart nginx: Restarts the nginx service.
- sudo systemctl enable nginx: Enables nginx to start automatically at boot.
- sudo systemctl disable nginx: Disables nginx from starting automatically.
- systemctl status nginx: Shows the current status of the nginx service.
- service: Start, stop, or restart services (older SysVinit/Upstart method, still works on many systems).
- sudo service nginx start: Starts the nginx service.
- sudo service nginx status: Checks the status of the nginx service.
- timedatectl: Query and change the system clock.
- timedatectl: Shows the current system time, timezone, and NTP synchronization status.
- sudo timedatectl set-timezone Asia/Kolkata: Sets the system timezone.
- reboot: Restart the system.
- sudo reboot: Initiates a system restart.
- shutdown: Power off the system.
- sudo shutdown now: Shuts down the system immediately.
- sudo shutdown -h +60 “System going down for maintenance”: Shuts down the system in 60 minutes with a warning message.
14. Containerization & Virtualization
- docker: Manage Docker containers.
- docker ps: Lists currently running Docker containers.
- docker ps -a: Lists all Docker containers, including stopped ones.
- docker run -d -p 8080:80 nginx: Runs an nginx container in detached mode (-d), mapping local port 8080 to container port 80.
- docker images: Lists local Docker images.
- docker build -t myapp:1.0 .: Builds a Docker image named myapp with tag 1.0 from the Dockerfile in the current directory.
- kubectl: Manage Kubernetes clusters.
- kubectl get pods: Lists all pods in the current Kubernetes namespace.
- kubectl get nodes: Lists all nodes in the cluster.
- kubectl apply -f deployment.yaml: Applies a Kubernetes resource defined in deployment.yaml.
- kubectl logs <pod_name>: Displays logs for a specific pod.
15. Git Version Control
- git status: Show the status of changes.
- git status: Shows which files are staged, unstaged, or untracked.
- git add: Add files to staging.
- git add .: Stages all changes in the current directory for the next commit.
- git add file.txt: Stages specific file.txt.
- git commit: Commit changes.
- git commit -m “Descriptive commit message”: Records staged changes to the repository with a message.
- git push: Push changes to a remote repository.
- git push origin main: Pushes changes from the local main branch to the main branch on the origin remote.
- git pull: Pull changes from a remote repository.
- git pull origin main: Fetches changes from the origin remote’s main branch and merges them into the local main branch.
- git clone: Clone a repository.
- git clone https://github.com/user/repo.git: Creates a local copy of a remote Git repository.
- git remote: Manage set of tracked repositories.
- git remote -v: Shows the URLs of remote repositories (e.g., origin).
- git remote add upstream https://github.com/user/forked_repo.git: Adds a new remote repository named upstream.
- git remote remove old_remote: Removes a remote repository by name.
- git remote rename old_name new_name: Renames a remote repository.
- git branch: List, create, or delete branches.
- git branch: Lists local branches.
- git branch new_feature: Creates a new branch named new_feature.
- git branch -d old_branch: Deletes old_branch (only if merged).
- git checkout: Switch branches or restore files.
- git checkout main: Switches to the main branch.
- git checkout -b new_branch: Creates and switches to a new branch.
- git checkout — file.txt: Discards local changes to file.txt.
- git merge: Merge two or more development histories together.
- git merge feature_branch: Merges feature_branch into the current branch.
16. Other General Utilities
- env: Display environment variables.
- env: Lists all environment variables set for the current shell session.
- date: Show or set the system date and time.
- date: Displays the current date and time.
- date +%Y-%m-%d: Formats the output to YYYY-MM-DD.
- alias: Create command shortcuts (as detailed in Shell Scripting).
- source: Execute commands from a file in the current shell.
- source ~/.bashrc: Reloads the .bashrc file, applying any changes to aliases or environment variables without restarting the shell. Often written as . ~/.bashrc.
- sleep: Pause for a specified amount of time.
- sleep 5s: Pauses execution for 5 seconds.
- sleep 1m: Pauses execution for 1 minute.
17. Network Troubleshooting and Analysis
- traceroute: Track packet route (as detailed in System Information).
- netstat: View network connections, routing tables, and more (as detailed in System Information).
- ss: Display socket statistics (modern alternative to netstat).
- ss -tuln: Shows active TCP and UDP connections that are listening, displaying numerical addresses. It’s often faster and more feature-rich than netstat.
- ss -s: Displays a summary of socket statistics.
- iptables: Manage firewall rules (as detailed in Networking).
18. Advanced File Management
- find: Search files by various criteria (as detailed in File Management).
- locate: Quickly find files by name (as detailed in File Management).
19. File Content and Manipulation
- split: Split files into parts.
- split -l 500 largefile.txt smallfile_: Splits largefile.txt into smaller files, each containing 500 lines. The output files will be named smallfile_aa, smallfile_ab, etc.
- split -b 10M video.mp4 video_part_: Splits video.mp4 into 10MB chunks.
- sort: Sort lines in files (as detailed in Text Processing).
- uniq: Remove duplicates from sorted files (as detailed in Text Processing).
20. Advanced Shell Operations
- xargs: Build and execute commands from standard input.
- find . -name “*.txt” | xargs rm: Finds all files ending with .txt in the current directory and its subdirectories, and then passes each found filename as an argument to the rm command, effectively deleting them.
- cat urls.txt | xargs wget -c: Downloads URLs listed in urls.txt using wget.
- tee: Read from standard input and write to standard output and files.
- echo “new data” | tee file.txt: Prints “new data” to the terminal AND writes “new data” to file.txt.
- command | tee -a log.txt: Appends the output of command to log.txt while also displaying it on the terminal.
21. Performance Analysis
- iostat: Display CPU and I/O statistics (as detailed in System Information).
- vmstat: Report virtual memory stats (as detailed in System Information).
- sar: Collect and report system activity information. (Requires sysstat package, e.g., sudo apt install sysstat).
- sar -u 5 5: Reports CPU usage statistics every 5 seconds, 5 times.
- sar -q: Reports queue length and load averages.
- sar -r: Reports memory utilization.
22. Disk and File System Analysis
- lsblk: List block devices (as detailed in Disk Management).
- blkid: Display block device attributes (as detailed in Disk Management).
- ncdu: Disk usage analyzer with a TUI (Text User Interface).
- ncdu /: Analyzes disk space usage starting from the root directory, providing an interactive, navigable interface to identify large files and directories. (Often needs to be installed, e.g., sudo apt install ncdu).
23. File Compression and Decompression
- gzip: Compress files.
- gzip largefile.txt: Compresses largefile.txt and renames it to largefile.txt.gz. The original file is removed.
- gunzip: Decompress .gz files.
- gunzip largefile.txt.gz: Decompresses largefile.txt.gz back to largefile.txt.
- bzip2: Compress files with higher compression than gzip.
- bzip2 largefile.txt: Compresses largefile.txt to largefile.txt.bz2.
- bunzip2: Decompress .bz2 files.
- bunzip2 largefile.txt.bz2: Decompresses largefile.txt.bz2 back to largefile.txt.
- zip/unzip: For .zip archives (as detailed in File Management).
24. Environment Variables and Shell Management
- env: Display all environment variables (as detailed in Other General Utilities).
- set: Set or display shell options and variables.
- set: Displays all shell variables and functions.
- set | grep PATH: Filters the output to show only the PATH variable.
- unset: Remove an environment variable.
- unset VAR_NAME: Removes the environment variable VAR_NAME.
25. Networking Utilities
- arp: Show or modify the IP-to-MAC address mappings.
- arp -a: Displays the ARP cache, showing the IP addresses and corresponding MAC addresses of devices on the local network.
- nc (netcat): Network tool for debugging and investigation.
- nc -zv example.com 80: Tests if a specific port (80) is open and listening on example.com (-z for zero-I/O mode, -v for verbose).
- nc -lvp 8080: Listens (-l) for incoming connections on port 8080 (-p). Can be used for simple data transfer or chat.
- nmap: Network scanner to discover hosts and services. (Requires installation, e.g., sudo apt install nmap).
- nmap -sP 192.168.1.0/24: Scans all hosts on the 192.168.1.0/24 subnet to see which are active (ping scan).
- nmap example.com: Scans common ports on example.com.
- nmap -p 22,80,443 example.com: Scans specific ports 22, 80, and 443 on example.com.
26. System Security and Permissions
- umask: Set default permissions for new files and directories.
- umask: Displays the current umask value.
- umask 022: Sets the default permissions for new files to 644 (owner r/w, group r, others r) and for new directories to 755 (owner r/w/x, group r/x, others r/x). The umask value is subtracted from 666 (files) or 777 (directories).
- chmod: Change file or directory permissions (as detailed in File Management).
- chattr: Change file attributes (used for more advanced, kernel-level file permissions).
- sudo chattr +i file.txt: Makes file.txt immutable, meaning it cannot be modified, deleted, or renamed by anyone, including root, until the immutable attribute is removed.
- sudo chattr -i file.txt: Removes the immutable attribute.
- lsattr: List file attributes.
- lsattr file.txt: Shows the attributes (like immutability) set on file.txt.
27. Container and Kubernetes Management
- docker-compose: Manage multi-container Docker applications. (Requires Docker Compose installation).
- docker-compose up -d: Starts containers defined in docker-compose.yml in detached mode.
- docker-compose down: Stops and removes containers, networks, and volumes defined in docker-compose.yml.
- minikube: Run a local Kubernetes cluster.
- minikube start: Starts a local Kubernetes cluster using a virtual machine.
- minikube dashboard: Opens the Kubernetes dashboard in your browser.
- helm: Kubernetes package manager. (Requires Helm installation).
- helm install myapp ./myapp-chart: Installs a Helm chart located in ./myapp-chart as a release named myapp.
- helm list: Lists all installed Helm releases.
- helm upgrade myapp ./myapp-chart: Upgrades an existing Helm release.
28. Advanced Git Operations
- git stash: Temporarily save changes.
- git stash: Stashes (saves) your current uncommitted changes (both staged and unstaged) in a temporary area, allowing you to switch branches or perform other operations.
- git stash pop: Applies the most recently stashed changes and removes them from the stash list.
- git rebase: Reapply commits on top of another base commit.
- git rebase main: Reapplies the commits from your current branch onto the tip of the main branch. This rewrites history and creates a cleaner, linear history. Use with caution, especially on shared branches.
- git log: View commit history.
- git log: Shows the full commit history.
- git log –oneline –graph –all: Provides a compact, graphical representation of the commit history across all branches.
- git log -p file.txt: Shows commit history with diffs for file.txt.
29. Troubleshooting and Debugging
- strace: Trace system calls and signals.
- strace -p 1234: Traces the system calls made by the process with PID 1234. Extremely useful for understanding what a program is doing at a low level (e.g., what files it’s opening, what network connections it’s making).
- strace <command>: Traces the system calls of a specific command.
- lsof: List open files by processes (as detailed in System Information).
- dmesg: Print kernel ring buffer messages (as detailed in Logging and Auditing).
30. Data Manipulation and Processing
- paste: Merge lines of files.
- paste file1.txt file2.txt: Combines corresponding lines from file1.txt and file2.txt, separated by a tab.
- paste -d’,’ file1.txt file2.txt: Uses a comma as a delimiter between combined lines.
- join: Join lines of two files on a common field. (Requires files to be sorted on the join field).
- join file1.txt file2.txt: Joins lines from file1.txt and file2.txt that have a common first field.
- column: Format text output into columns.
- cat data.txt | column -t: Takes tabular data from data.txt and formats it into nicely aligned columns.
31. File Transfer
- rsync: Sync files between local and remote systems (as detailed in Archiving and Backup).
- scp: Securely copy files between hosts (as detailed in File Management).
- ftp: Transfer files using FTP protocol. (Less secure, consider sftp or scp for secure transfers).
- ftp example.com: Connects to an FTP server at example.com. You’ll then be prompted for credentials and can use FTP commands like get, put, ls.\
32. Job Management and Scheduling
- bg: Send a job to the background (as detailed in Process Management).
- fg: Bring a background job to the foreground (as detailed in Process Management).
- at: Schedule a command to run once at a specified time. (Requires at service to be running).
- echo “echo Hello, DevOps” | at now + 2 minutes: Schedules the command echo Hello, DevOps to run 2 minutes from now.
- at 03:00 tomorrow: Opens a prompt to enter commands to be run at 3:00 AM tomorrow.
- atq: Lists pending at jobs.
- atrm <job_number>: Removes a pending at job.
So, in this blog post, we explored the fundamental architecture of Linux, breaking down its layered structure from hardware to applications. We delved into the crucial role of the Kernel as the OS’s core, managing resources and bridging with hardware, and understood how the Shell provides a powerful interface for interaction.
Now that you have a grasp of these core components, the best way to solidify your understanding is by getting hands-on. There are numerous excellent resources available online for setting up your own Linux environment, whether it’s via a virtual machine, dual-boot, or a cloud instance. I highly encourage you to utilize these resources, set up your preferred environment, and start experimenting with commands to see these concepts in action!
Leave a Reply
You must be logged in to post a comment.