Welcome back to The Code Neuron! In our continuous journey to master data manipulation and management, we’ve already covered essential SQL concepts. Today, we’re diving deeper into advanced MSSQL features that are crucial for writing powerful, efficient, and maintainable code. We’ll explore Common Table Expressions (CTEs), Window Functions and Cursors with multiple descriptive examples for each.
To illustrate these concepts, let’s start by setting up a fresh database and populating it with sample data.
Setting Up Our Sample Database
First, let’s create a database and two tables: Employees and Orders. We will also add a Managers table to demonstrate a more complex use case for CTEs.
-- Create the database
 CREATE DATABASE AdvancedSQLExamples;
 GO
 USE AdvancedSQLExamples;
 GO

 -- Employees Table
 CREATE TABLE Employees (
  EmployeeID INT PRIMARY KEY IDENTITY(1,1),
  FirstName VARCHAR(50) NOT NULL,
  LastName VARCHAR(50) NOT NULL,
  Department VARCHAR(50) NOT NULL,
  Salary DECIMAL(10, 2) NOT NULL,
  ManagerID INT
 );

 -- Managers Table (used for a recursive CTE example)
 CREATE TABLE Managers (
  ManagerID INT PRIMARY KEY IDENTITY(1,1),
  FirstName VARCHAR(50) NOT NULL,
  LastName VARCHAR(50) NOT NULL
 );

 -- Insert sample data into Managers
 INSERT INTO Managers (FirstName, LastName) VALUES
 ('Michael', 'Scott'),
 ('Dwight', 'Schrute'),
 ('Jim', 'Halpert');

 -- Insert sample data into Employees with ManagerIDs
 INSERT INTO Employees (FirstName, LastName, Department, Salary, ManagerID) VALUES
 ('John', 'Doe', 'Sales', 50000.00, 1), -- Michael
 ('Jane', 'Smith', 'Marketing', 60000.00, 2), -- Dwight
 ('Peter', 'Jones', 'Sales', 55000.00, 1), -- Michael
 ('Mary', 'Williams', 'IT', 70000.00, 3), -- Jim
 ('David', 'Brown', 'Marketing', 62000.00, 2), -- Dwight
 ('Susan', 'Miller', 'IT', 75000.00, 3), -- Jim
 ('Kevin', 'Malone', 'Accounting', 45000.00, 2); -- Dwight

 -- Orders Table
 CREATE TABLE Orders (
  OrderID INT PRIMARY KEY IDENTITY(1,1),
  EmployeeID INT FOREIGN KEY REFERENCES Employees(EmployeeID),
  OrderDate DATE NOT NULL,
  Amount DECIMAL(10, 2) NOT NULL
 );

 -- Insert sample data into Orders
 INSERT INTO Orders (EmployeeID, OrderDate, Amount) VALUES
 (1, '2024-07-20', 1200.00),
 (2, '2024-07-21', 850.50),
 (1, '2024-07-22', 1500.75),
 (3, '2024-07-23', 920.00),
 (4, '2024-07-24', 2100.20),
 (2, '2024-07-25', 780.90),
 (5, '2024-07-26', 1800.50),
 (6, '2024-07-27', 1150.00),
 (1, '2024-07-28', 1600.00);
GOCommon Table Expressions (CTEs)
A CTE is a temporary, named result set that you can reference within a single SELECT, INSERT, UPDATE, or DELETE statement. They are like temporary views that only exist for the duration of the query. CTEs greatly improve code readability by breaking down complex, multi-step queries into simpler, more logical parts.
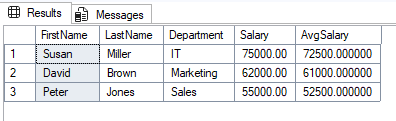
Example 1: Finding Employees Above Department Average Salary
This is a classic use case for a CTE, as it neatly separates the logic for calculating the average salary from the main query.
-- This CTE calculates the average salary for each department.
 WITH DepartmentAvgSalary AS (
  SELECT
   Department,
   AVG(Salary) AS AvgSalary
  FROM
   Employees
  GROUP BY
   Department
 )
 -- The main query joins the Employees table with the CTE to filter results.
 SELECT
  e.FirstName,
  e.LastName,
  e.Department,
  e.Salary,
  das.AvgSalary
 FROM
  Employees e
  JOIN DepartmentAvgSalary das ON e.Department = das.Department
 WHERE
e.Salary > das.AvgSalary;Output:
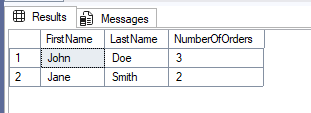
Example 2: Simplifying Complex Joins
CTEs can make a query with multiple joins much easier to read and debug. Here we find employees who have made at least two orders.
-- This CTE first finds the count of orders for each employee.
 WITH EmployeeOrderCounts AS (
  SELECT
   EmployeeID,
   COUNT(OrderID) AS NumberOfOrders
  FROM
   Orders
  GROUP BY
   EmployeeID
 )
 -- The main query then joins this CTE with the Employees table.
 SELECT
  e.FirstName,
  e.LastName,
  eoc.NumberOfOrders
 FROM
  Employees e
  JOIN EmployeeOrderCounts eoc ON e.EmployeeID = eoc.EmployeeID
 WHERE
eoc.NumberOfOrders >= 2;Output:
Window Functions
Window functions perform calculations across a set of table rows, or a “window,” that are related to the current row. They are incredibly useful for tasks like ranking, calculating moving averages, and finding cumulative sums. The key difference from standard aggregate functions is that window functions do not collapse rows into a single output row.
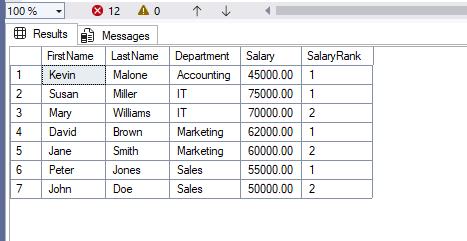
Example 1: Ranking Employees by Salary
The RANK() function assigns a rank to each row within a partition. It’s a great way to see how an employee compares to others in their group.
SELECT
  FirstName,
  LastName,
  Department,
  Salary,
  -- PARTITION BY groups the data by department
  -- ORDER BY defines the ranking order within each group
  RANK() OVER(PARTITION BY Department ORDER BY Salary DESC) AS SalaryRank
 FROM
  Employees
 ORDER BY
  Department,
SalaryRank;Output:
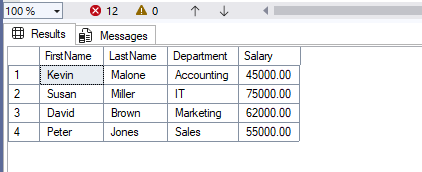
Example 2: Finding the Top Earner per Department
The ROW_NUMBER() function assigns a unique, sequential integer to each row within a partition. This is perfect for when you need to select only one row per group, such as the highest salary.
-- Using a CTE with a window function to find the top earner.
 WITH RankedEmployees AS (
  SELECT
   FirstName,
   LastName,
   Department,
   Salary,
   -- ROW_NUMBER assigns a unique number to each row in the partition
   ROW_NUMBER() OVER(PARTITION BY Department ORDER BY Salary DESC) AS RowNum
  FROM
   Employees
 )
 -- The final query filters for only the top row (RowNum = 1) in each department.
 SELECT
  FirstName,
  LastName,
  Department,
  Salary
 FROM
  RankedEmployees
 WHERE
RowNum = 1;Output:
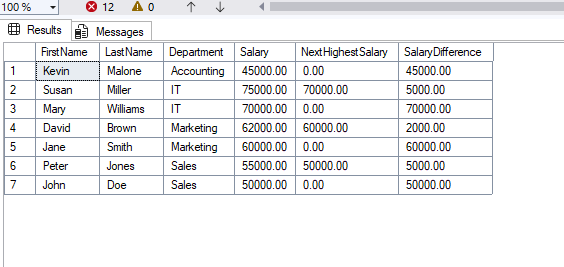
Example 3: Comparing an Employee’s Salary to the Next Highest
The LEAD() and LAG() window functions allow you to access data from a preceding or subsequent row in the same result set. This is ideal for time-series analysis or comparing values.
SELECT
  FirstName,
  LastName,
  Department,
  Salary,
  -- LEAD gets the salary of the next row in the sorted set
  LEAD(Salary, 1, 0) OVER (PARTITION BY Department ORDER BY Salary DESC) AS NextHighestSalary,
  -- We can then calculate the difference
  Salary - LEAD(Salary, 1, 0) OVER (PARTITION BY Department ORDER BY Salary DESC) AS SalaryDifference
 FROM
  Employees
 ORDER BY
  Department,
Salary DESC;Output:
Cursors
A cursor allows you to iterate and process the rows of a result set one at a time. While set-based operations (like UPDATE with a WHERE clause) are almost always preferred for performance, cursors are sometimes necessary for specific procedural logic that is difficult or impossible to perform on an entire set at once.
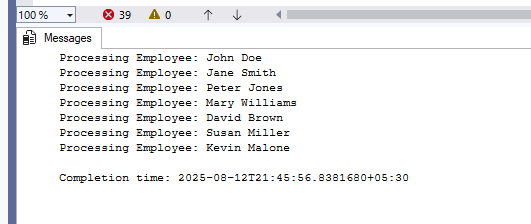
Example 1: Iterating and Printing Employee Information
This is a basic example showing the procedural nature of a cursor.
DECLARE @EmployeeID INT, @FirstName VARCHAR(50), @LastName VARCHAR(50);

 -- 1. Declare the cursor and define its result set.
 DECLARE employee_cursor CURSOR FOR
 SELECT EmployeeID, FirstName, LastName
 FROM Employees;

 -- 2. Open the cursor to fetch the first row.
 OPEN employee_cursor;

 -- 3. Fetch the first row from the cursor into our variables.
 FETCH NEXT FROM employee_cursor INTO @EmployeeID, @FirstName, @LastName;

 -- 4. Loop as long as rows are being fetched successfully.
 WHILE @@FETCH_STATUS = 0
 BEGIN
  PRINT 'Processing Employee: ' + @FirstName + ' ' + @LastName;
  -- 5. Fetch the next row.
  FETCH NEXT FROM employee_cursor INTO @EmployeeID, @FirstName, @LastName;
 END;

 -- 6. Close and deallocate the cursor to free up resources.
 CLOSE employee_cursor;
 DEALLOCATE employee_cursor;
GOOutput:
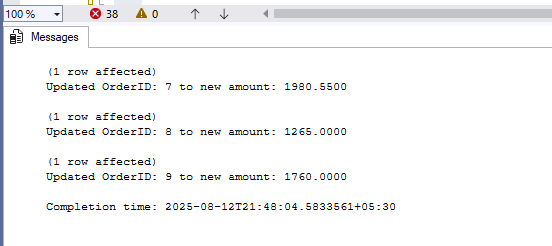
Example 2: Updating Data with a Cursor
This example demonstrates a practical, though sometimes controversial, use of a cursor to perform row-by-row updates based on a specific condition.
DECLARE @OrderID INT, @OrderAmount DECIMAL(10, 2);

 -- Declare a cursor for all orders with a specific condition.
 DECLARE order_cursor CURSOR FOR
 SELECT OrderID, Amount
 FROM Orders
 WHERE OrderDate > '2024-07-25';

 OPEN order_cursor;

 FETCH NEXT FROM order_cursor INTO @OrderID, @OrderAmount;

 WHILE @@FETCH_STATUS = 0
 BEGIN
  -- A complex procedural update could happen here.
  -- For this example, let's apply a 10% bonus on recent orders.
  UPDATE Orders SET Amount = @OrderAmount * 1.10 WHERE OrderID = @OrderID;
  PRINT 'Updated OrderID: ' + CAST(@OrderID AS VARCHAR) + ' to new amount: ' + CAST(@OrderAmount * 1.10 AS VARCHAR);
  FETCH NEXT FROM order_cursor INTO @OrderID, @OrderAmount;
 END;

 CLOSE order_cursor;
 DEALLOCATE order_cursor;
GOOutput:
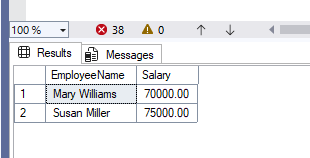
Example 3: Data Migration with a Cursor
Cursors can be used for data migration tasks where you need to read from one table and insert into another, perhaps with some custom processing on each row.
DECLARE @EmpName VARCHAR(100), @Salary DECIMAL(10, 2);

 -- Let's assume we have a new table for high-salaried employees
 CREATE TABLE HighSalaryEmployees (
  EmployeeName VARCHAR(100),
  Salary DECIMAL(10, 2)
 );

 DECLARE high_salary_cursor CURSOR FOR
 SELECT FirstName + ' ' + LastName, Salary
 FROM Employees
 WHERE Salary > 65000;

 OPEN high_salary_cursor;

 FETCH NEXT FROM high_salary_cursor INTO @EmpName, @Salary;

 WHILE @@FETCH_STATUS = 0
 BEGIN
  INSERT INTO HighSalaryEmployees (EmployeeName, Salary) VALUES (@EmpName, @Salary);
  FETCH NEXT FROM high_salary_cursor INTO @EmpName, @Salary;
 END;

 CLOSE high_salary_cursor;
 DEALLOCATE high_salary_cursor;
GOOutput:
Conclusion
Mastering these advanced MSSQL features will elevate your SQL skills from a simple data retriever to a powerful database developer and administrator. CTEs and Window Functions help you write clean and complex queries, while Cursors, though to be used sparingly, give you the power of procedural control.
Keep practicing these concepts with different scenarios to solidify your understanding. Stay tuned for more insights into the world of data and SQL!
Leave a Reply
You must be logged in to post a comment.