Welcome back to our blog series on the fascinating realm of databases! Following our foundational exploration of Databases and RDBMS, today we’re taking a focused dive into a powerful and widely adopted Relational Database Management System: Microsoft SQL Server (MSSQL). This post will serve as your starting point for understanding, installing, and connecting to MSSQL, laying the groundwork for your SQL journey.
What is MSSQL? Unveiling the Powerhouse
At its core, Microsoft SQL Server (MSSQL) is a robust and versatile Relational Database Management System (RDBMS) developed by Microsoft. From powering intricate enterprise applications to managing the data behind your favorite websites, MSSQL plays a critical role in the modern digital landscape. It’s renowned for its reliability, security features, scalability, and a rich set of tools for managing and analyzing data effectively.
Understanding the Client-Server MSSQL Architecture
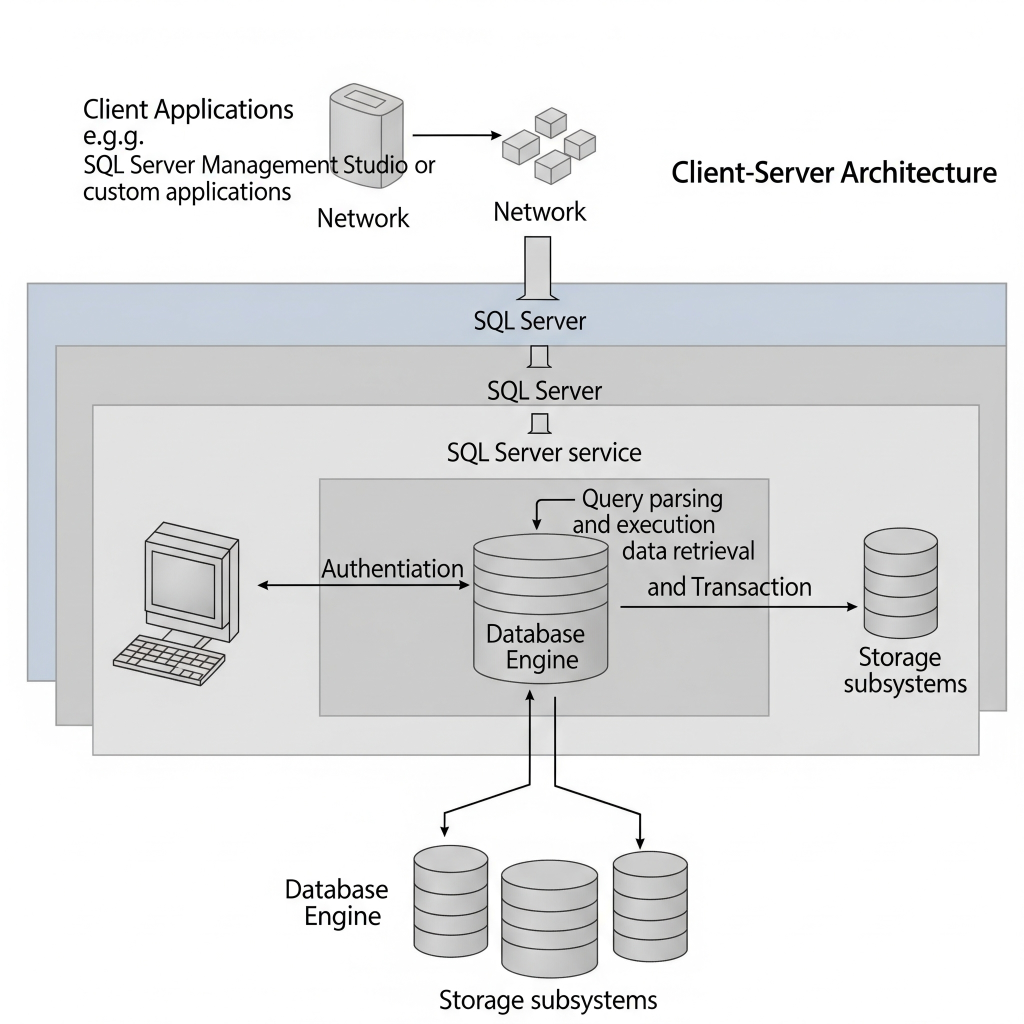
MSSQL operates on a fundamental client-server architecture, a model that separates the responsibilities of data storage and processing (the server) from the applications or users that need to access and manipulate that data (the clients).
- SQL Server (The Server): This is the heart of the system. It’s the software instance that resides on a machine (which could be a physical server or a virtual machine) and is responsible for:
- Storing the actual database files.
- Listening for connection requests from clients.
- Processing SQL queries sent by clients.
- Managing data integrity, security, and concurrency.
- Returning the requested data or performing the requested actions.
- Client Applications: These are the tools, applications, or scripts that interact with the SQL Server. They don’t hold the data themselves but rather send requests to the server to perform specific tasks. Examples include:
- Web applications that need to retrieve product information.
- Desktop applications used for data entry and reporting.
- Database management tools like SQL Server Management Studio (which we’ll discuss later).
- Custom scripts written in languages like Python or Java.
This separation offers several key advantages:
- Centralized Data Management: All your valuable data is stored in a single, managed location, simplifying backups, security measures, and overall administration.
- Scalability and Performance: The server can be optimized and scaled independently of the clients, allowing for efficient handling of increasing data volumes and user traffic.
- Enhanced Security: Access to the database can be tightly controlled at the server level, ensuring data confidentiality and integrity.
- Concurrency Control: Multiple clients can access and modify data simultaneously without causing conflicts, thanks to the server’s sophisticated concurrency management mechanisms.
Understanding ODBC Connection: The Universal Translator for Applications
ODBC (Open Database Connectivity) is a standard API (Application Programming Interface) that allows applications to access data from various database management systems (DBMS), including MSSQL. Think of it as a universal translator that enables different applications to speak the same language to a database, even if those databases are from different vendors (like Oracle, MySQL, or SQL Server).
When an application wants to connect to an MSSQL database using ODBC:
- The application uses the ODBC API to make a request.
- The ODBC Driver Manager (part of the operating system) loads the appropriate ODBC driver for SQL Server.
- The SQL Server ODBC driver then translates the application’s request into a format that SQL Server understands and sends it to the server.
- SQL Server processes the request and sends the results back through the driver and Driver Manager to the application.
ODBC is crucial for interoperability, allowing a wide range of applications (especially those not specifically tailored for SQL Server) to communicate with your databases without needing to know the low-level details of each specific database’s communication protocol.
Getting Started: Installing MSSQL Server and SSMS (Windows Users)
Now, let’s get our hands dirty with the installation process. We’ll cover both MSSQL Server itself and SQL Server Management Studio (SSMS), the primary tool we’ll use to manage and interact with our SQL Server instances.
Installing MSSQL Server
- Choose Your Edition: Microsoft offers various editions of SQL Server tailored for different needs and budgets. For learning and development purposes, the Developer Edition is an excellent choice as it’s free and provides the full feature set of the Enterprise Edition (though licensed for non-production use). The Express Edition is another free option suitable for smaller applications and learning. Download the installer from Microsoft’s official website.
- Run the Installer: Execute the downloaded setup file. You’ll be presented with several installation options. For most beginners, the “Basic” installation provides a streamlined experience. However, for more control over the components installed, choose “Custom.”
- Feature Selection (for Custom Installation): If you opt for a custom installation, ensure you select the Database Engine Services. This is the core component that runs the SQL Server database. You might also consider installing other features like Analysis Services or Reporting Services later as needed.
- Instance Configuration: You can choose to install a default instance or a named instance. A default instance is typically accessed using just the server name, while a named instance requires specifying the instance name (e.g.,
YOURCOMPUTERNAME\SQLEXPRESS). For simplicity, especially for your first installation, a default instance is often recommended. - Server Configuration: This is a crucial step. You’ll need to configure the authentication mode:
- Windows Authentication: This mode uses your Windows user account to authenticate with SQL Server. It’s generally considered more secure for environments where users have Windows domain accounts.
- Mixed Mode (Windows Authentication and SQL Server Authentication): This option allows you to use both Windows accounts and dedicated SQL Server logins (with usernames and passwords) for authentication. If you choose this, you’ll be prompted to set a password for the
sa(System Administrator) account, which is a powerful built-in SQL Server account. Remember this password!
- Collation: The default collation settings are usually suitable for most users. Collation determines how SQL Server sorts and compares character data.
- Complete the Installation: Follow the on-screen prompts to complete the installation process. This might take some time depending on your system.
Installing SSMS (SQL Server Management Studio)
SSMS is a separate application that provides a graphical interface for managing your SQL Server instances.
- Download SSMS: Navigate to Microsoft’s website and download the latest version of SQL Server Management Studio. It’s a free download.
- Run the Installer: Execute the downloaded setup file.
- Follow the Prompts: The installation process is generally straightforward. Follow the on-screen instructions to complete the installation. You’ll typically just need to agree to the license terms and choose an installation location.
How SSMS Connects to MSSQL: Direct and Optimized Communication
While ODBC provides a general way for any application to connect to any database, SQL Server Management Studio (SSMS) doesn’t primarily use ODBC internally for its direct connections to SQL Server. Instead, SSMS, being a dedicated Microsoft tool for SQL Server, leverages more direct and optimized data access technologies.
Historically, SSMS (and other Microsoft applications interacting with SQL Server) used technologies like the SQL Server Native Client or OLE DB Provider for SQL Server. These are specialized data access components that communicate directly with the SQL Server protocol, offering better performance and access to all the latest SQL Server features compared to a generic ODBC driver.
Think of it this way: ODBC is like a universal travel adapter – it lets you plug your device into any socket, but it might not be the most efficient connection. SSMS, on the other hand, comes with its own built-in, perfectly matched plug for SQL Server, ensuring the most efficient and feature-rich connection possible.
When you open SSMS and connect to your SQL Server instance, it’s utilizing these native drivers to establish a highly efficient communication channel.
Connecting MSSQL with SSMS: Your Gateway to Database Interaction
With both MSSQL Server and SSMS successfully installed, it’s time to establish a connection and start interacting with your database engine.
- Launch SSMS: Open SQL Server Management Studio from your Start Menu.
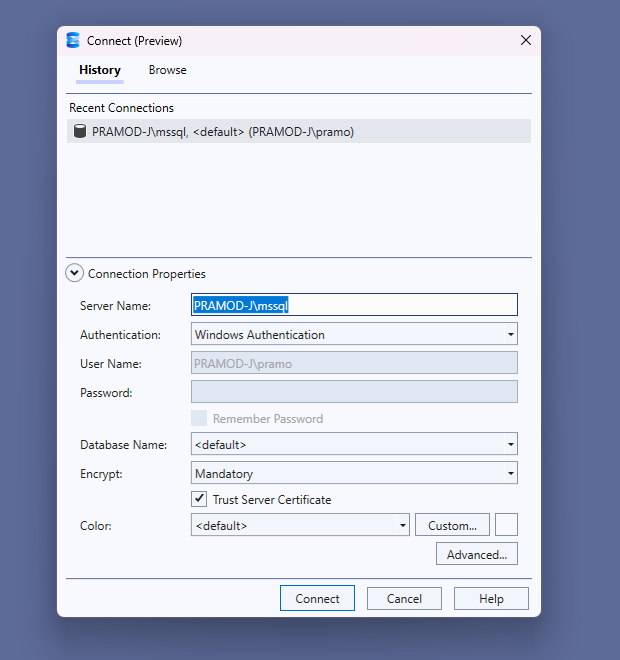
- Connect to Server Dialog: The “Connect to Server” dialog box should appear automatically. If not, you can manually open it by clicking “Connect” in the Object Explorer pane (usually on the left) and selecting “Database Engine…”.
- Server Type: Ensure that “Database Engine” is selected in the “Server type” dropdown.
- Server Name: Enter the name of the SQL Server instance you want to connect to.
- For a default instance on your local machine, you can typically use
.or(local)orlocalhost. - For a named instance on your local machine, you’ll use the format
YOURCOMPUTERNAME\INSTANCENAME(e.g.,.\SQLEXPRESS). ReplaceYOURCOMPUTERNAMEwith your computer’s name andINSTANCENAMEwith the name you gave the instance during installation.
- For a default instance on your local machine, you can typically use
- Authentication: Choose the appropriate authentication method:
- Windows Authentication: If you selected Windows Authentication during SQL Server installation, choose this option. SSMS will use your current Windows login credentials to attempt a connection.
- SQL Server Authentication: If you selected Mixed Mode and want to use a specific SQL Server login, choose this option and enter the Login (e.g.,
sa) and the Password you configured during the SQL Server installation.
- Click Connect: Once you’ve entered the server name and chosen your authentication method, click the “Connect” button.
If the connection is successful, the Object Explorer pane in SSMS will display your connected SQL Server instance, showing databases, security settings, server objects, and more. Congratulations, you’ve successfully connected to your MSSQL Server!
A Note for Mac Users: Online SQL Compilers/Editors
If you’re a Mac user, you might have noticed that Microsoft SQL Server and SQL Server Management Studio (SSMS) are primarily designed for Windows. While there are ways to run Windows environments on a Mac (like virtual machines or Boot Camp), a simpler and often more convenient option for learning and practicing SQL is to use an online SQL compiler or editor.
What is an Online SQL Compiler/Editor? These are web-based tools that allow you to write and execute SQL queries directly in your browser, without needing to install any software locally. They typically provide:
- An integrated environment to type your SQL commands.
- A pre-configured database (often a lightweight version or a sandbox environment) where you can create tables, insert data, and run queries.
- An output window to display the results of your queries or any error messages.
Why Use One?
- No Installation Required: Perfect for Mac users or anyone who prefers not to install heavy software.
- Instant Access: Just open your web browser and start coding.
- Cross-Platform: Works on any operating system with a web browser.
- Focus on SQL: Allows you to concentrate on learning SQL syntax and concepts without getting bogged down in server administration.
While they might not offer the full administrative power of SSMS, online compilers are excellent for practicing queries, understanding SQL syntax, and experimenting with database operations. A quick search for “online SQL compiler” or “online SQL editor” will reveal many free options available to get you started!
What’s Next? The Adventure Begins!
With your MSSQL environment now up and running (or your online compiler ready to go!) and SSMS connected, you’ve successfully laid the foundation for an exciting journey into the world of database management and querying. In our upcoming blog posts, we’ll start exploring the core functionalities of SQL, including:
- Creating your first database and understanding database structure.
- Defining tables and specifying the types of data they can hold.
- Inserting, updating, and deleting records within your tables.
- Writing basic SQL queries to retrieve and manipulate the data you’ve stored.
Stay tuned as we delve deeper into the power of SQL and unlock the potential of your MSSQL database!
Leave a Reply
You must be logged in to post a comment.